Monday, October 3, 2011

The 2 Minute Infinity Scarf

Yes... it's been FOREVER... but I'm back with a fun and super quick tutorial!  Yeah!

Last week I went to Joann Fabrics with a friend who found this awesome green jersey knit fabric that she was going to use to make a dress out of.  Well, it was my favorite color green and really super soft so I couldn't pass up getting a little of it for myself too...

2 Minute Infinity Scarf
(Isn't that an awesome green color?)

I figured I could make a great little scarf out of this fabric and add a little color to my pretty boring (mostly black and grey) work wardrobe at the same time.

And so now you get my 2 Minute Infinity Scarf Tutorial!  :)

Yes, it seriously took me only 2 minutes (or less) to make!  I'm not kidding... it's the perfect quick sewing project and would make a great gift item to add to your list of holiday gifts to make :)

OK, so here we go...

2 Minute Infinity Scarf

Basically...
  1. Buy some knit fabric - the longer the better (mine was 60") and have it cut to 1/8 yard (or cut it yourself, but that will probably add an extra minute to the project ;) )
  2. Fold it so that the short sides are together, and pin.
  3. Sew your edges together :)
That's it!
So easy, right? I could see this in lots of great colors and patterns filling up my closet :)

2 Minute Infinity Scarf

What are you waiting for? Go make one of your own :)
And if you do make one yourself... please link it up in the comments here, I'd love to see it!

Saturday, August 20, 2011

I've got to try this...

As I was searching through some items I had pinned (on Pinterest - it's amazing if you haven't tried it) on my food board, I ran across this awesome 3 Ingredient, 60 second chocolate mug cake recipe...
and seeing how I am always in the mood for chocolate, I decided that I just had to try it!!

Chocolate Mug Cake

And so I did... It was so super easy, and delicious!!  My husband even said it was good.  I topped mine with a sprinkling of powdered sugar, but it would be really good with some whipped cream or chocolate chips (or both).  Yum! 


Friday, August 19, 2011

Photo blog?

Lately I've been thinking that this might be more effective and interesting if this were a photo blog instead of a regular blog. It's much easier for me to share cool stuff via photos and a few words rather than lots if words and few photos. Plus the easier it is for me to keep this up via my mobile devices the more there will actually be to see. Thoughts?

Monday, July 25, 2011

30 Day Shred - Day 1 again!

Yeah... I did 4 days of my workout after I mentioned it 2 weeks ago, then went on vacation for a week and left my DVD at home.  So no shredding while on vacation.  That seems fair though - right?  :)

I did definitely get much more exercise while on vacation than I normally do when I go to work though.  I spent my days playing with the kids and walking through crowded shopping areas - so I definitely got my steps in.  I've been wearing my pedometer and when at work during the week it's really hard to get even 8000-ish steps in.  This past week I was getting like 15,000 - 18,000 in each day.  :)  Yeah!  So at least I wasn't a total bum while on vacation.

So today I started back on my 1200 calorie limit and did my DVD again.  This time I even got my husband to do it with me!  Yeah!  He says he'll do it again too!!  :)

Oh yeah, while on vacation I tried to eat better but wasn't going to kill myself to just have 1200 calories.  I wanted to be able to enjoy my vacation and try different things.  So I adjusted my calorie counter to track me at around 2000 calories per day which it said was how many were allowed to stay at my current weight.  Worked pretty good too... I weighed myself yesterday and only gained 1lb back.

That puts me at a total of 3lbs lost... 4lbs the first week, plus the 1 I gained back.  I can deal with that. :)

Wednesday, July 13, 2011

Workout update

So far so good!  I started the 30-Day shred work out on Monday morning and it wasn't too bad.  Yes, I definitely felt the burn but it wasn't so horrible that I can't do it.  The big thing that I realized after my first workout was that I really need a better sports bra!  hehe

So, after buying a new sports bra (and wearing a regular bra, and a second sports bra)... I did my 2nd workout on Tuesday evening.  Much better, but wow were my legs feeling the burn!  After my workout I decided to take a lap around the neighborhood.  It was quiet except for the bugs and there was actually a breeze blowing so it was kind of nice.  I probably would have done another few laps if I hadn't gotten so bored.  I really should have taken my iPod so I had something to listen to. :)

Now it's day 3... I think I'm going to give my body a day to rest.  I plan on getting up in the morning and doing the workout again.

So far so good... I've been counting my calories and staying around 1200 net calories.  I haven't had a soda since last Friday and I'm feeling good.

And did you notice the little ticker over there?  3 lbs lost!  I will probably go ahead and say that most of that is from water weight, but hey... I'll take it.  Seeing those numbers (no matter what the reason) is really nice motivation, especially in the beginning!

Saturday, July 9, 2011

Gonna try something new...

I've really been thinking about what I can do to get healthy, maybe loose some of this excess weight, and just plain feel better.  I'm sick of being tired all the time, and tired of hating just about every photo that I see of myself.

Yes, like every woman... I've said this same thing to myself over and over again.  Sometimes I make some progress, but it always becomes an issue again.  This time I'm at least going to get started by making some progress, then I'll work more on keeping it a major part of my life.

Yep, it's time to start the diet and exercise thing again.  The diet part is really just me eating better - healthy foods, no sodas, only natural sugars and only that in small amounts.  Sugar has always been my main downfall, and since I found out that I have some glucose tolerance issues I really want to make this change so that I don't find myself facing diabetes later down the road.

My first goal date is August 11th.  Just over a month away.  My main goal for this date is just to see some progress... I want to be realistic.  We are taking a trip to the beach and it would be wonderful if I could feel like I've made some progress by then.

You'll notice a new ticker in my side bar over there - you see the cute little one with the tape measure?  Yup... there I will report any changes. 

I'm taking measurements and photos for myself, and I'm thinking about if I'll share them or not - that's a tough thing to decide to do.  But... I will take them now, and if I decide to then I'll have them to share. :)

I bought the 30 Day shred DVD and some weights... I know it will be a major effort, but after seeing other people's amazing 30-Day results, I feel pretty confident that I could get some great results myself if I put in the effort.  We'll see what happens.

As far as eating goes, I really can't say that I'm going to do any major popular type of diet.  My main goal is to track my calories and try to stay near 1200 per day.  And of those 1200 calories, to make the most of them... I have done this before when I was pregnant and had gestational diabetes - I know I can do it again. 

That's it!  I'm off to take a few measurements now and get started with my exercise program tomorrow. :) 

Saturday, July 2, 2011

I needed something to wear today, so I made a skirt!

Sorry... There are no photos or links just yet... My actual computer has been sent away for repairs so until at least next Tuesday, all I have is my iPad. There's no taking decent pics with my camera and getting them downloaded until I get my computer... And well, it's just a little too much effort to go back and forth for links on the iPad. I'll add it all in later in the week.

Yep... I'm good like that :)
Well... Not exactly, the skirt is a little wonky and I definitely see ways to make it better next time...
But, it's wearable. I really did wear my new skirt today - out in public and everything. Nobody looked at me strange so I guess it passed the test :)

But for real, I've seen several tutorials out there in blog land about how to make cute little skirts with the yoga style fold over waistband and also ones for making a skirt with a t-shirt. So today I kinda combined some ideas that I've seen and did my own!

Awhile ago I bought a men's XXL basic t-shirt in anticipation of specifically making a skirt for myself with it. I'm proud to say that I actually used the shirt for it's intended purpose, and actually finished the project as well.

This was a really simple way to make a skirt and I definitely plan on doing it again!

Simply lay out your t-shirt flat and use a ruler as a guide. Cut the width of the shirt right underneath the arms. This will give you the longest length of skirt to work with. Plus, you already have a hem on the bottom of your t-shirt so this will save you a stitch or two. :)

Now, cut rectangles from the upper portion of the shirt. This will need to be 1/2 the width of your waist (because you'll have two sides, so that will make it your full waist measurement. You can cut this a little bit smaller than your waist measurement so that the waistband will actually stretch some and therefore stay on your waist. Remember, it's t-shirt fabric... It stretches.

I made the mistake of not taking it in enough, and by the end of the day my waistband had stretched out enough and the skirt was falling off. I'll be taking it in some now so that I can still wear the skirt out in public. ;)

Next, you'll need to pin your two waistband pieces together at the short sides. Use lots of pins... This fabric will stretch and lots of pins helps while you are sewing. Now, sew up your side seams. It's a good idea to use a zig zag stitch or similar if you don't have a serger.

Fold the waistband piece in half over itself. Your wrong sides should be together. This part should now look like the waistband piece of a yoga skirt - cause well, it is. ;)

Increase your stitch length and tension to as loose as possible and run a stitch around the top part of your skirt. Do not back stitch at the ends. Gently pull on one of the strings at each end to gather your fabric. Try to spread the gathers evenly around the skirt to make it look the best. I didn't do so good at this step... I was lazy and my gathers are mostly in the back. Take your time... It will be worth it.

Next, pin your waistband to your skirt - with the skirt inside out, slide the waistband inside with raw edges together. Pin.... Lots!
The more pins you use here the better you will be. Make sure that while you are pinning that the gathers are still evenly spread out.

Once you have fully pinned your pieces together, sew them together.

Ta-da! You now have a new comfy skirt! And how long did it take? Surely no longer than 30 minutes :) even better!

I'll be making at least one more of these skirts, so I'll come back and share that one too.

Saturday, June 25, 2011

And... Done!

OK, so I'm feeling a bit better after my long to-do list this morning.  Today I did actually get some work done around the house plus I got around to making 2 dresses!  Yup.. TWO of them!  I even got a few more rows knit on my sweater as well :)

My sister came by after stopping and picking up some fabric at JoAnn.  I took a few measurements and got started with her new dress(es).   A few days ago, my sister, Whitney (of Caught You on Camera), sent me a link to the McIntosh Knockoff Dress at Maybe Matilda... and asked me to make her one.  It's a super cute dress and honestly, really very similar to my Kate Dress that I have made for my daughters.  Same basic concept, except the McIntosh Knockoff features this really fun sash and the best part... pockets!

I was really excited to make a dress with pockets in it... I've never done it until today, and I must say I'm hooked!  I'll probably never (or rarely) ever make a skirt again without pockets.  Shoot, I might even go take a look in my closet and start figuring out which dresses and skirts I could add some pockets to.  hehe  I better slow down though for now. :)

Anyway, the tutorial was super easy to follow and really simple to do.  To be perfectly honest, if you can cut a square/rectangle and sew a straight line, then you can make this dress.    Here's how mine turned out...

This was the first one I made...
McIntosh Knockoff Dress


McIntosh Knockoff Dress
I followed the directions exactly - the measurements given in the tutorial were exactly the same as my sister's measurements - how lucky is that!? :) We measured to have the waist of the skirt fall right below her belly button.

On the second one, we made the skirt about an inch above the belly button.
McIntosh Knockoff Dress

McIntosh Knockoff Dress
This one I did a little more A-line. I didn't have a skirt to trace, so I just cut my squares a little wider then folded in half length-wise and cut a diagonal line from the top to the bottom, making sure that I left the width of the waist large enough so that I could gather the skirt still. I just did a straight hem on this skirt and it worked just fine.

The only problem we had was with the sash.  I didn't cut it long enough the first time around, so I ended up going back and having to cut it and add more.  The extra fabric is still here so I think I'm going to re-do the sash to make it look better.

Oh yeah, and the sash... this was the fun part of how it turned out for me - I had the idea that since the fabrics that Whit brought over coordinated, that we could make the sash double sided.  This way I only had to make one sash and also both prints would show when it was tied, adding a little bit more fun to the outfit. :)

These dresses would be really cute with various belts really... just to mix up the outfit a bit...

I'm going to make myself one soon hopefully!!

what to do first...?

I've got a long list of projects I'd LOVE to work on this weekend.  I'm feeling pretty crafty right now and all these projects are all over the spectrum - knitting, sewing, hair bow making, jewelry making, etc.  I really should learn to focus on just one thing at a time.  Oh well. 

Also this weekend, We've got to get some progress made on de-cluttering this house.  We decided that we will work on the final touches of getting our bedroom back in shape - so mostly just getting the last of the clothes put away somewhere.  Next, we will tackle the kitchen.  My main project in there will be to get the table and shelves cleared off of all the junk that has gathered and maybe clean out the pantry.  There's so much stuff in there that we have likely forgotten about and is probably stale by now anyway.  Time to get it out of this house!

So on top of my house cleaning that has to get done, I'm wanting to do all sorts of fun stuff.  I'm being realistic knowing that it won't all get done... but I do want to at least accomplish something.  I should probably start with the netbook case that I've been working on... it's so not going well though.  I tried following the pattern, but it's not written out very well... because I'm totally missing something.  I'm going to be having to make some adjustments to not waste what I've done so far.  We'll see how that goes.

I also need to hem a skirt for a friend, and hem a pair of my own pants.

I need to make these earrings for another friend.

And I need to make some hair bows - a big sister/little sister combo.

I'd like to work on this dress that my sister asked me to make for her, but I haven't heard back from her about any plans to get together - so this probably won't happen.  I'd also like to make one for myself, so maybe I'll gather the materials for mine at least.

I had saved this pattern in my stash awhile back, and now would like to try making it for my girls.  I've got the pattern printed out... next I just need to cut and tape it together.  Then choose my fabric for the top. :)  We all know that's the tough part... ;)

I'd also like to make this skirt for myself... the pattern has been sitting around here for almost 2 years now.  I'm having trouble picking out which fabric to use as well.

Let's see what else...

I want to make some more progress on my Garter Stitch Swing Cardi.  It's kind of taking awhile because I keep laying it down to work on smaller, quicker projects.

And speaking of smaller, quicker projects.  I need to make another of these hats for a friend at work.  Also, I need to make some flowers to go on a few of the hats that I have already finished.

So you see, that's quite a long "would like to do" list and I know I won't finish it all - but maybe having this little list will help me work on things in the right order and get at least some progress made. :)

Tuesday, June 21, 2011

WOW

I hadn't realized It's been so long since I've posted anything... Geez... I'm sorry about that.  I really had the best intentions of keeping this thing going.  I'm not giving up just yet, just consider the past 2 (almost 3) months a bit of a vacation.  I'm getting back on board to post again, at least once a week. :)

So yeah... I have actually been busy with lots of stuff, just haven't found the time to post about it.  A big thing that has kept be busy, and tired in the evenings (besides the kids) is that my DesiLea Boutique co-hort, Desiree got married!  Yeah!  We have been spending lunch breaks at our "real job" running errands for her wedding... so yeah, if you've ever gotten married or helped anyone who has then you realize why that's been keeping us busy.  Of course, that means our Etsy shop went on a bit of a vacation as well.  We are working on some ideas to re-stock the shelves (or pages, however you want to think of it) and will have things back up and running sometime this summer.

I have actually been crafting stuff too... I've gotten back to my yarn crafts and have been busy obsessing over buying new supplies (cause you can never have enough, right?) and browsing through all sorts of patterns for all kinds of projects.  By the way, have you ever looked through all the patterns and such that they have available on Ravelry?  I warn you, it can be addictive... but there are some really awesome patterns out there and so many of them are 100% FREE!  Even better, right?

So far, I have crocheted a few hats, and flowers and stuff like that.  I've started a crochet sweater which took a wrong turn so I frogged it (what?? It means that I unraveled the whole thing and it no longer exists :)  ).  I started a knit sweater, and ended up putting it down for a few days... when I came back to it I noticed that somehow I managed to knit a hole into it, so that was frogged as well.  Now, I'm using that same yarn that I started the other two sweaters with and trying once more to make a sweater with it.  I figure that either 3rd time's the charm or I just need to give up and try a different yarn (maybe it's bad luck or something?  LOL).

Dress up for Ravelry
Like that? That's the Garter Stitch Swingy Sweater by Jenn Pellerin that I am currently working on.  It will be black and I hope to find some really fun buttons to use on it.  I'm going to worry about actually completing the sweater first though before I go to look for buttons.  Good idea, right? 

My favorite thing about the pattern is that it's kind of a guideline/formula to follow to knit your own sweater in your own specific size.  I just hope that I've done the math correctly, and this ends up fitting me.  If not, then I can probably find someone who it will fit and save it as a Christmas gift or something.

So yeah, that's what I've been up to.  I'll be back soon with more fun stuff... promise :)

Thursday, May 5, 2011

I'm back! Alive and well, and with power again!

Ahhh... it's nice to be back.  I know I'm a slacker and should have posted early last week with Easter photos and such, but well... things got busy, and then it was Wednesday...

Wednesday, April 27th, 2011... a very long and exhausting day, but one that will go down in history!  If you haven't heard of the tornadoes that ripped through the Southeastern United States, then you will have after reading this...

Tornadoes are something that we get used to hearing about in the South in the Spring time... during the Spring when the weather can't make up it's mind whether or not it wants to be hot or cold, storms start brewing and we get the best of it.  I live in North Alabama and when the weatherman starts showing us lines of storms coming from Mississippi, we can pretty much count on them passing through our area as well.

I expected last Wednesday to be a stormy day, I expected there to be tornado warnings and to be sent to take cover in the hallways at work when the sirens went off.  It was a pretty nasty day from the start.  I had to get to work early to finish up a project that I had been working on and so I left my house around 6am.  I drove through some really bad wind and rain on my way to work.  As soon as I sat down at my desk, the few of us who were there already were notified of the first tornado warning of the day and sent to the hallway for cover.  (FYI - anytime a warning is issued for our county then they make us go to the halls for safety reasons)

By 11:30am I was being called to the hallway for the 3rd time of the day.  The storms were a lot worse than anyone expected, and they just kept coming our way.  There had already been some very devastating tornadoes in our state and with the way things were looking for the rest of the day, the closed my work and sent us all home around 12:30pm.  I ended up going over to my In-Laws house because that is where my girls were at.  We spent the entire day there watching the weatherman show us photos and maps of the lines of tornadoes that were still headed our way.

This is from the National Weather Service and shows the paths of the tornadoes that came through our area and their EF rating.  We live right between the EF1 and EF5... just barely missed us on either side.

Around 7pm, we decided that we really had to try to get home... or make sure we still had a home to get to at least.

It was a very scary drive home.  What normally takes about 20 minutes, took us an hour.  The main problem was that so many of the roads were blocked by fallen trees, power lines and flooding that we kept having to turn around and find an alternate way home.

When we finally made it home, we were very happy to see that yes, our house was still standing.  There was no damage, and everything was just fine.  We were very lucky!

About a mile North of us is where the F5 passed over - many homes were destroyed, many people injured and too many lives lost.

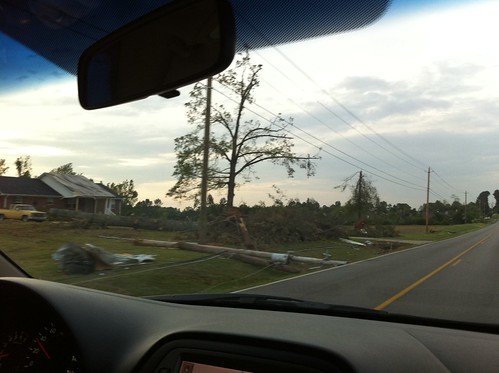
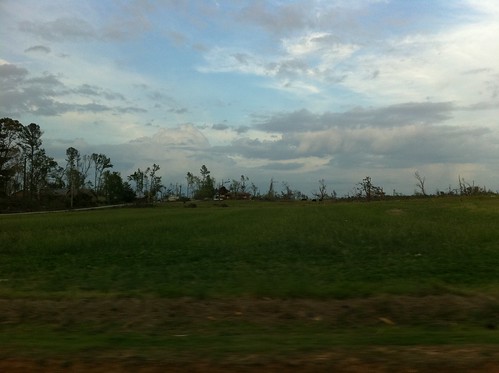
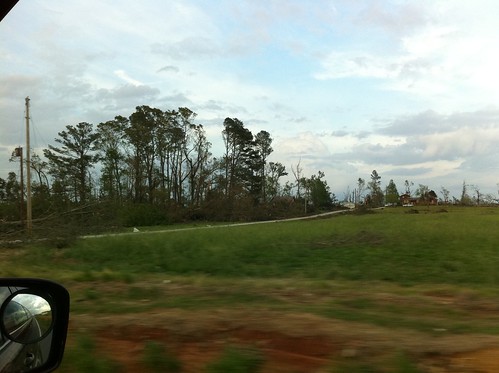
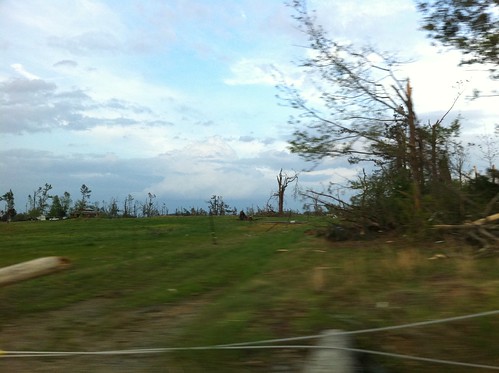
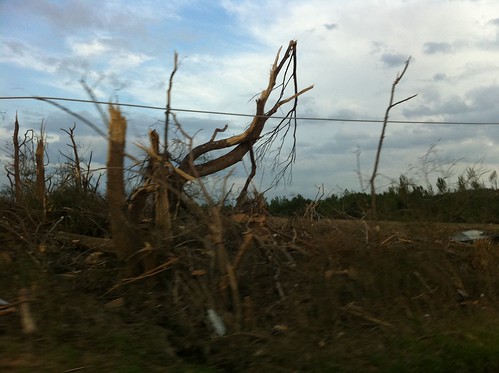
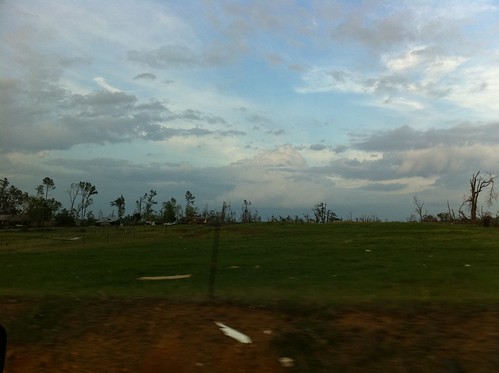
These are a few photos that I snapped of the area a few days ago.  There has been major cleanup done before these were taken, but you can still see the impact that it made...

IMG_0907

IMG_0908

IMG_0909

IMG_0904

IMG_0902

IMG_0905

These photos really are nothing compared to the other areas in this path...

This is a photo I found of a grocery store that was hit on Hwy 53 near the Anderson Hills community.  The blue roof building in the background is a credit union building that only suffered slight damage (windows blown out, roof damage, etc.) compared to the rubble of the grocery store.

Lots of other photos can be found here if you are interested.

We were definitely really lucky to have gotten through this virtually unaffected.  We were without power for 6 days and therefore inconvenienced when it came to being able to do things like take a hot shower or watch TV, but really that's all it was for us personally.  I definitely won't complain one bit!

I've got more stories and photos about how we kept ourselves and two toddlers entertained for 6 days of no power... but more on that in a few days.

Friday, April 22, 2011

What I'm making this weekend...

There are so many things that I want to work on right now... and for some reason I keep looking at even more cool ideas.  I am really bad at finding lots of project ideas, then never getting around to actually making them.   My most recent obsession has been crochet hats and flowers :)

Despite all of the fabulous ideas out there, I really can only do so much... so here are my to-do's for this weekend.

  1. Netbook Case - A friend at work asked if we (me & my DesiLea Boutique business partner) could make her a netbook case.  This was right about the time that we had come across this tutorial for an iPad Case.  I'm going to follow the basic rules of the tutorial but adjust the size to fit the dimensions of the netbook.  I promised to bring this finished on Monday, so it has to be the top priority on my craft list this weekend :)  I can't wait to see how it turns out!  Stay tuned!
  2. This Sweet Hat - Awesome huh?  I've been wanting to make one of these cute brimmed hats ever since I first saw them.  I like to try a newborn size first to get a feel for the pattern, since that's the smallest size.  This first one (if all goes well) will turn into a sweet gift for a friend's new nephew who should be born any day now.  I can't wait to see how this turns out!
Realisitcally, I think that's about all that will get done this weekend.  Hopefully I'll get the chance to get a few photos of SQ in her brand new hat that I just finished...

Toddler Size Hat!
Please excuse the cell phone photo for now... This is why I really want to get some good ones of it being worn tomorrow :)

Cute huh?  It's so super soft too!  I absolutely LOVE the cotton yarn that I used for this... I wish it came in more colors (maybe it does, and my store just didn't have them all), I'm thinking this is my new go-to yarn for anything baby/kid related.  Oh... it's I Love This Cotton Yarn in Pistachio for the main hat and Pink for the light pink flowers. The dark pink is just something extra that I had in my stash - I can't remember what it is, but it's not nearly as soft.

Anyway, it's looking like it will be a pretty busy weekend so far.  In the morning I think I'll pack up the girls and go do a little bit of shopping.  I totally need a new pair of denim capri pants to wear... my ones from last year are TOO BIG! (awesome huh?!).  While I'm out with the girls I think I'll leave my husband home to mow the yard. :)  Then hopefully the rest of the day I'll be able to get a little bit of cleaning and stuff done around the house and of course work some on the projects listed above.

Sunday will be very busy!  We'll be heading over to see both sides of the family - lunch at one house, dinner at the other.  My only concern is when will the girls get their nap?  I really didn't think it through when I committed us to go to both places.  Oh well, it will work out just fine :)

I'll be back with some updates about the projects as soon as they get finished :)

Tuesday, April 19, 2011

A little bit of crochet

By now you've noticed that I am fairly random with my craft projects. I try lots of different things and tend to be a little scattered. It's just something different to keep me from getting bored. :)

Last week I got a text message from a friend asking me to whip up a gift for a baby shower. So I started brainstorming and eventually decided to make a cute little crochet baby hat.


What do you think? It's super soft and I'm surprised at how cute it turned out. A little secret... I've never made a complete crochet hat before this one. I'm so happy it ended up being cute, because I was really starting to run out of alternative ideas for baby headwear. For some reason I kept focusing back on the crochet

Of course, after that I browsed around a bit more and looked to see what other free patterns I could find. I came across ravelry.com and found lots of really awesome project ideas. Revelry is a community sire for knit and crochet enthusiasts. Luckily there were tons of awesome beginner patterns to choose from.

I came across another really cute hat pattern that i decided to try for my girls. It seemed more appropriate for this time of year because it's more of an open stitched hat... I leaves a bit of breathing room. Of course, not that I'll likely have much luck getting either of my girls to keep this new hat on their heads for very long, but I've got something cute at least that maybe I can bribe them into wearing for at least a few photos.

I'll share more about that later... After I finish a second one for the other kid :). Hopefully with several. Cute photos of them actually being worn.

Sunday, April 10, 2011

I finally sewed something!

Its been about a week or more since I've actually sewed anything... Or made anything crafty at all. I guess I just needed a break. Today I finally dug out a project that I had cut out a few weeks ago because it has to be finished this week. So I did make a bit of progress on that project... More about that later :)

I have been thinking about making myself a sleeve or case for my new iPad since before I ever bought it. I haven't wanted to take my iPad anywhere outside of the house because I don't have any sort of protective cover, screen protector or anything.

After a weeks worth of browsing online for the perfect protective case, I finally placed my order on Amazon last night... So that is on the way :)

So tonight since I had the sewing machine out... I decided to throw together a quick little iPad sleeve. I wasn't intended to be anything fancy, just something to protect against scratches and offer a little padding when I want to carry my iPad outside of the house.


Cute huh? I'll be making another one of these this week and I'll actually take photos to do a tutorial...so check back for more details.

This one is double lined/padded with felt and has a Velcro closure. It took probably about 5-10 minutes to make, and that was with making up the steps as I went along. So once you know the steps, you can probably make it in under 5 minutes. How's that for a simple project?

I've got a few more ideas to make this even a little more useful so maybe I'll include those with the tutorial.

On another note, I am sitting here watching Extreme Couponing for the first time. I've heard a lot about this show but hadn't seen it until now... All I can say is that this is CRAZY! Honestly, what do you need with 60 bottles of mustard when you don't even eat mustard? It is pretty awesome how you can work the system though to get all these things for practically nothing.

Sunday, April 3, 2011

we went to the park

To be perfectly honest, I haven't really done any sewing this past week.  I just haven't been in the right mood.  I've got a few things started but just haven't been in the mood to continue them just yet.  Oh well, they will get done!

So instead of sharing something fun and crafty, I'm going to just share something fun :)

It's been crazy at our house this week.  The girls have taken turns being brats (usually it's just one at a time thankfully).  Mostly their moods seem to be due to lack of naps (or quality naps) during the day.  Here's hoping things work out better this next week.

Anyway, I was determined to get these girls outside during the beautiful weather we were having this weekend.  We did have to run a few errands though, and so I wasn't quite sure we would fit it all in.  We didn't make it over to the park before nap time like originally planned (they fell asleep in the car on our way to the park), so we made plans to take them back out after they napped and grab a bit of dinner to take home.

I'm so glad we made it out... and that I remembered to bring my camera :) 

NK had a great time running back and forth between the different play sets.

IMG_2569-web
She loved the duck (one of those metal animals on the spring)

IMG_2564-web
And looked like a movie star in my sunglasses :)

IMG_2585-web
SQ spent most of her time looking like this - a little scared by all the other big kids running around. We had to hold her for the first bit of the time we were there, until Daddy took her down the slide. After that she loosened up a bit and at least walked around on her own.

IMG_2584-web
THIS is my absolute favorite capture from the day. Not quite sure about what it is, but I think it turned out great. I don't usually like turning my camera crooked when I take a photo, but for some reason this just works for me.

I did eventually get both of the girls in the swings for a bit.  SQ FINALLY had a great time and spent the whole time that she was swinging, giggling :)  I'm so glad she finally got into it!

Of course, NK pitched a fit when it was time to leave - as expected.  But we made it out, and were able to make our last two stops before we headed home.

What a day!  I'm so glad we were finally able to get out of the house and let the kids run around (or at least one of them run) and do something different.  Hopefully next time SQ will be in a better mood and end up having more fun.

Tuesday, March 29, 2011

St. Patty's Day Skirt

Yeah... I'm a few weeks late posting this... I know...

I did make a cute and comfortable skirt that I wore for St. Patrick's Day this year - because it's green, of course!  :)

stpats_green_skirt

I found this post with this awesome skirt pattern and although I didn't exactly follow instructions exactly, my skirt turned out pretty cute.  It's got the same waistband concept as the pattern and that is what made is really comfortable.

What do you think?  

The Schoolhouse Tunic - On Hold

The Schoolhouse Tunic is on hold... after all that work getting motivated and getting everything all set up, I have come to a halt with the issues with my sleeves.

Basically, I'm not in the mood to rip the seams that need ripping... not quite yet at least.  So it's sitting here on my dress form... waiting.

Schoolhouse Tunic - On Hold

Saturday, March 26, 2011

Color Inc. Weekend Giveaway: Newborn Cable Knit Bonnet from Little Labyrinth! - printLife

Good Morning!

Normally I don't share a lot of contest and giveaway links on here, but this one is way too cute and I just had to let you know about it.


Go check out this adorable hat by Little Labryinth and find out how you can enter to win!
Weekend Giveaway: Newborn Cable Knit Bonnet from Little Labyrinth! - printLife

Thursday, March 24, 2011

The Schoolhouse Tunic - part 2.1

Sleeves...
I've never made a top for myself with sleeves on it before.  The only sleeves I think I've ever done on my children's clothing has been the little simple things on the peasant top that I just recently made.

Sleeves are a little scary.

I started working on the sleeves of my tunic tonight - it was the next step in the pattern.  The instructions looked simple enough (run a few basting stitches, pull a small gather, pin sleeve to top and sew) so I figured I'd be able to get this done fairly quickly. (I had spent a good bit of time just browsing on the web tonight but I really wanted to make some progress on my top)

The basting was simple, as expected.

Then I went to pin my sleeve to the bodice piece.  I read instructions over and over but for whatever reason, I could not make my sleeve line up with the edges of the bodice.  The bodice was too long - so the gathering on the sleeve was really pretty pointless - I had to un-gather everything to get it to fit most of the way around.

I went ahead and stitched the sleeve on, then stitched the sleeve underneath and closed up one side of the bodice - but as I sit here looking at it, I'm afraid that I'm going to have some seam ripping to do.

The biggest problem I think is that the sleeve piece seems like it should have been larger.  I'm pretty sure that I cut out the correct size pattern piece so I'm not really sure why it's an issue.

I'm going to think on this a bit and figure out what really should be done with this.  Any ideas?

Tuesday, March 22, 2011

The Schoolhouse Tunic - part one

I said before that I have been wanting to make myself some new clothes... well, I am finally getting around to something that has been sitting on my project list for awhile.

The Schoolhouse Tunic from Sew Liberated...
Cute huh?  I think so too... bought this pattern sometime last year and am just now getting around to making it for myself.  That's how it usually goes though...


After going back and forth a few times about what kind of fabric I wanted to use, I finally settled on some nice black/gray linen.  I found it at JoAnn's for $14.99 a yard and had a 50% off coupon - total I spent around $18 for the fabric (not too bad for the nice quality stuff I got).  I actually kept trying to decide between the fabric that I ended up with vs. a linen almost exactly like the one that was on the model for the pattern... too funny :)

I started tracing the pattern pieces on to transfer paper some time last week, in hopes that I could have stitched this up over the past weekend - which was a good plan until I got sick and spent a good bit of the weekend in bed.

Anyway, on Monday evening I cut all my pattern pieces and started pinning the first few steps of the pattern together.

I did make one little adjustment to the bodice - I added a few extra inches to the bottom of the bodice pieces.  My normal problem with tops/dresses with seams under the bust line is that they are always too short for me and end up cutting me right through the center of my bust. 
 I'm hoping that the extra inches added solves this problem and doesn't cause me any other issues with the pattern.  I don't really see why it will, but it really is my luck that it would mess something up.   I guess we'll see when it's finished :)

Tonight, I was able to get the entire bodice piece put together.

schoolhousetunic_bodice_web

What do you think so far? (please ignore that skirt that is still pinned to my dress form - it's still waiting to be hemmed)

The next step is the sleeves and attaching them to the bodice...  I'll share step by step until I get this finished - hopefully over the weekend at the latest so that I can wear this sometime soon. :)

Tuesday, March 15, 2011

A First of Many - Peasant Blouse

When I found this tutorial for a child's peasant blouse at Prudent Baby I just knew that I had to make one for the girls.  If it really was as easy as it looks, then I'd make several.  I mean seriously... what a perfect addition to any little girl's wardrobe.

Peasant Top

Well, I am happy to announce that it really was as easy as it looked.  I followed the measurements that were listed for the 18mo - 2T size because, conveniently, that was the exact size that I needed (it's always nice when you can follow the instructions exactly as written instead of having to do the math to make it a different size).  The instructions were perfect and super simple to follow.

I've been really needing some sort of project that could give me some instant gratification and this was definitely a great one for that.  It took me most of the day (between wrangling two toddlers, one of whom was sick) but could have easily been done in about an hour for those people who can sit for an hour and just work on a single project.

Of course, I made a few customizations myself though.  I did not add the waistband elastic piece from the original tutorial.  I might try it out on future versions just for some variety, but didn't feel like it for this one.  But, I did add some cute little pockets on the front.

Peasant Top

I really like this fabric because it's almost got a vintage feel to it.  Nora actually picked it out herself when we were at the fabric store this past weekend.  It was cute and on clearance, so of course I couldn't say no.  :)

Another thing that is so awesome about this top... I really think that I could make it using 2-3 fat quarters (depending on the size).  I'll probably try that at some point and let you know how that turns out. :)

Peasant Top
As you can see, my model wasn't really up for the job tonight - too busy watching Toy Story. :)

I like how versatile this type of top is.  You can wear it as a shirt, or as a dress.  With short sleeves, long sleeves, or even no sleeves if you wanted.  It's nice and cool when the weather is hot but can also be worn with a long sleeve shirt underneath during the colder months.  I definitely see myself making lots of these types of tops in the future - maybe even eventually one for myself!

Thursday, March 10, 2011

my latest obsession: patterns

Once again, I've gotten hooked on finding new ideas of projects that I want to do.... I really have no need to ever look for another project or find new ideas, because my current "I'd like to do" list could seriously last me a lifetime.  That's part of the problem with having so may awesome resources, and ideas out there to find.

My latest obsession has been patterns.  I decided that I wanted to finally make something for myself so I started looking for ideas, which led me to the pattern books in the fabric store, and then of course I had to pick out just a few.  And of course, I can never stop at just one or two.  In the past 2 weeks I've bought probably close to 15 new patterns.  Most of them are for adult clothing (i.e. for me), but I did also get a new purse pattern, and a coat pattern for the girls (I'd like to make them coats for next winter I think).


This recent pattern obsession has been fueled a bit by some pattern sales, so at least I'm not paying full price.  Hobby Lobby has Simplicity patterns for $0.99 through Saturday, and JoAnn's has them for $1.99.

I've found lots of tops, a few dresses, skirts, even jackets and cardigans.  I'll share along the way as I actually make things.

One awesome tip I have found when it comes to buying patterns... or maybe more just picking out patterns... plan ahead.  If you know that a store has patterns on sale then that is definitely the time to buy them!  I mean, who really wants to pay $17.95 for a pattern when you can scout out the sales and get them for $0.99-$1.99 each? 

Another thing... get online and check out all the patterns and spend your time browsing through the designs at home.  I could honestly spend hours just looking through all the pattern catalogs at the stores, and of course I never actually have that much time to spend doing so.  If you browse the pattern manufacturer website and make a list of the patterns you are interested in then you can head straight to the pattern drawers at the store and save a ton of time. 

I've taken this a step further and will actually take a photo of the patterns that I like on my cell phone, that way if I am in search of a pattern then I can just flip through my phone till I find what I am looking for, and I've got all my info right away.  Or, on the chance that I do sit down and browse through the pattern catalogs, I take a photo of the page and then I have my info handy when I get to the drawers.

Oh yeah, and try not to get too stuck on a specific pattern - especially when they are on sale, the popular ones can easily sell out before you get there.  So be prepared with some alternatives.  There are so many similar patterns available that it's usually pretty easy to find another one that will work for you.

One little rant though - I am a bit disappointed by how a lot of the pattern sizes are limited.  I can find some great patterns but then end up disappointed that it isn't offered in my (larger) size.  Part of my whole reason for wanting to make clothing for myself is so that I can wear things that fit.  It's fairly easy to make things fit if you are able to make it from a larger (than accurate) size pattern and then adjust to take it in where needed, but I'm finding it quite a bit harder to make a pattern larger in the areas that I need it to be bigger to fit.

I'm thinking that maybe I need to learn how to customize pre-made patterns...

Wednesday, March 9, 2011

large(er) version of my buttercup bag

Remember when I made my first Buttercup Bag and I mentioned that I was going to make another one, but the enlarged version?  Well, I did... and now I'm finally getting around to sharing it with you :)

I made a few changes with this second bag that I think were definitely helpful, and made it turn out even cuter :)

First, I had recently come across this tutorial for making your own custom piping and thought it was really cool looking.  I had also been browsing through Flickr photos of the Buttercup Bag and got a bit of inspiration from other people's alterations.  Mainly, to use the piping on the bag and instead of having a single strap - to make two separate handles.

So I set out to make my own custom piping to match the lining fabric that I was using.  I didn't have enough fabric to cut my strips of fabric on the bias, but that was really not necessary for this project.  I could see where it would be necessary if we were putting the piping around lots of curved edges, but this was a pretty straight line, so it wasn't necessary.

lgbuttercup_pinpiping

I simply stitched the piping to the upper outer part of the bag before attaching that piece to the lower outer piece. It's really nice that if you don't get quite close enough to the edge of the piping then you can always re-stitch it to get closer.

lgbuttercup_stitchouters

Do you notice anything else a bit different about the photo above?

lgbuttercup_gathers

Instead of stitching the pleats in the lower outer pieces, I got a little lazy and just did a gather instead.  Honestly, I almost like the look of it better... plus it was much quicker than having to measure, press, pin and stitch all of those pleats.

For the handles, I simply measured out how long I wanted them to be, then cut strips of fabric (two of the outer fabric, two of the lining) of that width and length plus my seam allowances.  I pressed the edges of each piece and then did a top stitch all the way around to have the two pieces of fabric attached.  Oh yeah, I also used some heavyweight fusible interfacing on the outer fabric to give it a little more strength.

Once the handles were assembled, I just marked where they should be, pinned and then stitched them as I was stitching the outer and the lining together.  Simply make sure that your handles are on the right side of the outer fabric, but sandwiched between the outer and the lining (before it is turned right side out)... sorry, I forgot to get a photo of that part (I know it's a bit confusing, but maybe you get what I'm trying to say).

And here is the final product...

the outside
buttercup bag - large

and the inside
buttercup bag - large

Not too shabby huh?

*oh yeah, I kinda ad-libbed the pocket too - the size that the pattern called for was a little too small for what I needed.

Another difference between this finished bag and the first one I did (following the pattern exactly) was that I did not put in a magnetic closure... actually, I didn't add a closure at all.  I honestly didn't think it was necessary, especially with the double handles.

I've been carrying this bag around ever since I finished it, and I just love it!  It's still a little on the small side for me (I'm more of a big purse kinda girl), but it holds my essentials and is comfortable to carry.

I'll probably try to make another one sometime this year, but try enlarging the pattern even more.  I'd also like to try adding in a zipper closure maybe.

As I promised... (even though I'm super slow)

I know, I'm a few days late on the photos that I had been promising... it's been crazy around here, so that's really my own excuse (it's valid though).  I finally got a chance to sit down with my camera and computer and get these photos downloaded - I can't believe it's been about a month since I have downloaded photos!  That is so not like me at all... I'm going to be better!

I've got quite a few projects that I had done and haven't shared yet, so stay tuned for those in the next few days.

my almost finished skirt

As you can see, it still needs to be hemmed.  I'm getting there - but just not in much of a rush because I already know that it doesn't quite fit me either... so it will have to hang out in the closet until I drop a size or two. 

This skirt was really pretty easy to make.  The only difficulties I had was when I tried to add a lining to it.  See, I didn't start out planning on needing a lining but after making the first few stitches I realized that the skirt fabric was a bit see through.  It's not exactly work appropriate to have a semi-see through skirt, you know?  Well, I obviously didn't have any lining fabric with me at home so I had to plan another trip to JoAnns. 

In the mean time, I kept sewing along on the skirt.  I should have stopped when I got to the zipper part - but it was one of the first few steps and I was really wanting to get it put together.  In hindsight, I need to not put the zipper in until I have the lining ready.  It looks pretty rough on the inside...

Actually, next time I just need to pay more attention to my fabric choice and not get anything that needs a lining. :)

Oh yeah, if you are wondering... the pattern I used was from Simplicity's New Look collection, #6843


Like I said, it was really simple to follow... not a lot of steps either (it's one of those 1 hour patterns).  My only complaint is that the pattern only comes in one set of sizes... and it doesn't go up to my correct size (sadly, I guessed my measurements incorrectly).  I think I am going to do some reading about how to adjust a pattern and then maybe try this one again.

Does anyone know of any good resources for learning how to adjust a pattern for your own measurements?  Please leave any suggestions in the comments :)

Speaking of comments... I just love them!  Thanks to everyone who has left comments for me in the past... keep them coming!   I know I've been a little boring lately, but there really will be more fun stuff coming soon!

Saturday, March 5, 2011

It's going to be a good weekend

This past week has been an interesting one, and so I am glad it's over and now the weekend :)

Work has been interesting - not bad... just a weird week.  I actually do feel like I got a lot done at least, so that's good.

It was my Mom's birthday on Tuesday... Yeah!

We went to dinner for Mom's birthday last night but I had to leave early because the girls were sick and in bad moods... Boo! 
At dinner, I knocked over my margarita after only a few sips, leaving me with just a few sips left - what a waste.  Then on my way home I ran out of gas and got stranded half way in someones driveway until my husband could get there with enough gas to get us going again.  What a night!  As soon as the girls were bathed and in bed, I crashed myself.  Slept really good too!

But... today is a new day!  And although it's cloudy and wet outside, it's going to be a good day. 

I have had a shower and gotten dressed already - even have a little bit of makeup on.

I have finished an entire cup of coffee before it had a chance to get cold.

I have had a chance to play on the computer for a little bit now.

It's after 9:00 am and both of the girls are still asleep.  Shocking huh?  I think we are going to have to wake them up before too long.

I've got to run by the storage unit place before noon to close out our account (saving $60/month).

And we talked about trying to go get some donuts for breakfast this morning... still seeing how that one is going to pan out.

Today, I am going to finish that skirt that I have been working on all week.  And hopefully get my next project planned out and patterns traced and ready to go.

It's going to be busy, but I'm determined that it will be a good weekend!

More later with that finished skirt!  And I know I've been all talk lately... but I'll finally get some photos downloaded and posted soon - I've totally been a slacker on photos lately.

Thursday, March 3, 2011

MIA

Sorry I've been MIA all week.  It's been a super busy week at work, and I've just been really tired when I get home.  Half the week I haven't even touched the computer after I got home.  I have been working on a new skirt (for myself) to wear to work.  It's been interesting so far... I'll be back this weekend with the details and photos. :)

In the mean time... here's a little something to enjoy :)


Isn't she hilarious? Those are my glasses and of course her "pincess hat" :)

I'll be back this weekend :)

Saturday, February 26, 2011

Another dress and a trip to JoAnns (again)

Yeah! It's Saturday! :) I was so ready for the weekend to finally get here.

Anyway, I woke up early by the fault of a snoring husband and started thinking about what the plan was for the day, what I'd be able to get done, what we already had planned, etc. I remembered that the girls had been invited to a birthday party and their Aunt was brave enough to take them - both of them alone and without having naps. (that part of the day worked out surprisingly well at least)...

So yeah, I was thinking about what cute outfit I could dress the girls in and got the bright idea to make a new Kate dress for SQ to wear. I had it all cut out and ready to start stitching by the time anyone else woke up.

SQ's new dress
Cute huh?

I've had that flower print fabric for years now, and never could figure out what to really make with it. It turned out to be the perfect compliment to that awesome yellow shirt that the girls had gotten too tall for. :)

So, after getting everyone ready and going over to Mom's house... I sent the girls off to the birthday party and Mom and I ventured in to town to go to the new JoAnn Fabrics.  I've been a few times since they opened about 2-ish weeks ago and am so excited about their selection of fabrics.  I've been trying to avoid the place this week because it's their official Grand Opening - which means lines to the very back of the store (seriously, we waited in line for an hour today), but Friday I picked up a few new patterns for some new work clothes for myself.  Hobby Lobby doesn't really carry much in the lines of suiting fabric so that meant I would be making the trip to JoAnns. 

I did find some awesome fabrics!  A black-ish kind of print with a red lining fabric (for fun) to use to make a new dress, a brown stripe for a pencil skirt and a really pretty large flowered cotton print for an A-line skirt.  I'm excited to finally make something for myself.  More about these projects later!

It was a full day, but a good one :)  Tomorrow, I'm hoping to make my pencil skirt so that I can wear it to work this week. :)

Thursday, February 24, 2011

I just realized...

... how far behind I am in my blog reading. I just looked at Google Reader and I've got 1000+ unread posts. WOW, I've got some catching up to do...

Tuesday, February 22, 2011

Tonight, I'm going to relax

Last night I finished up my 2nd attempt at the Buttercup Bag, and I must say that it turned out so much better than the first one. I think I will soon be ready to add some to the shop. More details about the 2nd bag will be posted tomorrow... I'm too lazy to go get the camera and download the pictures. Tomorrow, I promise :)

Tonight I'm going to dig out my craft books and figure out my next project for The Craft Book Challenge while I lay in bed and catch up on whatever I have recorded on the TiVo, and maybe eat a Bomb Pop (because my wonderful husband bought me some - Thanks Honey!).

Tonight is for relaxing.

What projects are you currently working on?

Sunday, February 20, 2011

Autism Awareness Bow Tie

I got a message from a friend of mine last week asking for some help with a project.  Annie teaches Autistic children, and has been making some flower pins for her fellow teachers using the Autism puzzle print fabric.

There was one issue though, the school's Principal is a man... and well, she didn't think that he'd be very willing to wear a flower pin.  He does wear bow ties though!

This is where I come in... Annie asked if I could help her make a bow tie for her Principal.  That sounded like fun, and pretty easy so I told her I was in.

So, before she came over I wanted to be prepared and have the pattern and supplies ready.  It's kind of hard to find a free bow tie pattern.  The first one I found didn't really work too well when I tried to print it, so I looked some more and found a post on Greg's Blog.  The instructions show how he used a bow tie that he already had to trace a pattern.  After a few requests, he drew up the pattern to share with the rest of us.  You can find his pattern in the comments on his post.

Anyway, here it is... don't laugh at the photo (this was the best we could do with tying the bow tie - it definitely takes practice)

autism bow tie

Cute huh? It will look even better on her Principal (who does wear bow ties, so we figure he actually knows how to tie them correctly).

Have you ever made a bow tie?  Do you know anyone who would wear one?  This was definitely a super simple project and was quite quick to finish.  I could totally see making up a whole stash of these in an afternoon.

Next, I'd love to try to make some already tied ones with an elastic adjustable piece for younger boys.  They'd make great gifts for friends to use for holidays or other special occasions.


Tip Junkie handmade projects

Friday, February 18, 2011

My New Dress Form!

Guess what I found at my front door when I got home?

My new dress form!!!  It's a birthday gift and I can't wait to put it together and make something!  I think my first order of business will be to alter a few shirts that I already have that have never fit quite right. 

This will open up so many opportunities for making things for myself, rather than taking the easy way out and just making things for the kids. :)

I'll let you know how it goes :)

Wednesday, February 16, 2011

Score!

$5.39 + tax for 100!


Yeah, those are double pronged alligator clips... $5.39/100= about $0.05 each!

I found them at Sally's Beauty Supply. Look down low on the aisle that has the rollers. They also had single pronged ones. What an awesome find!

OK, so you may be wondering what I'm going to do with all these...
They will be used for hair clips for the girls and for the shop. If you have ever tried looking for these things, they can be kind of hard to find. And at a craft store then you will pay much more for them.

Hope this tips helps you out too!

Tuesday, February 15, 2011

OMG! Someone featured one of my projects!

WOW! How cool is this?


I was going around checking my usual link parties and of course pulled up Sew Woodsy... they show off their favorite projects from the previous week and I saw so surprised to see my patchwork makeup bag there!


Sooo cool!  This is the first time anyone has ever featured one of my projects!  Out of 49 projects submitted, mine was one that they really liked :)  I feel so honored :)

Thanks Sew Woodsy!
Related Posts Plugin for WordPress, Blogger...