
Photo from book
Cute huh? I had run across this post and The Crafter's Apprentice and that gave me a little extra push to go ahead and have this be my first project (there were quite a few really cute ones that I was trying to decide between).
Anyway... here is how mine turned out...
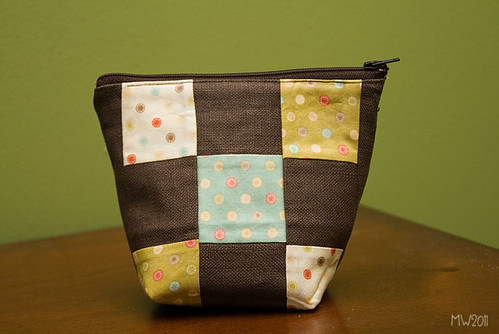
Not bad, huh? Well... it was a struggle.
This is my first ever patchwork project... so my blocks don't line up exactly. I partially blame this on the fabric (it wasn't the easiest to work with). Oh well. It takes practice.
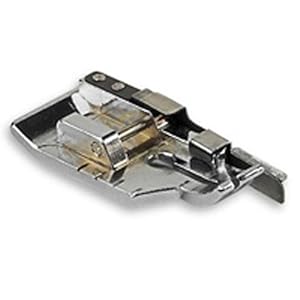
One thing that I have found invaluable for piecing pieces of fabric together (quilting, anything patchwork, anything with a 1/4 seam) is my new 1/4" quilting foot. Wow this thing was so helpful!
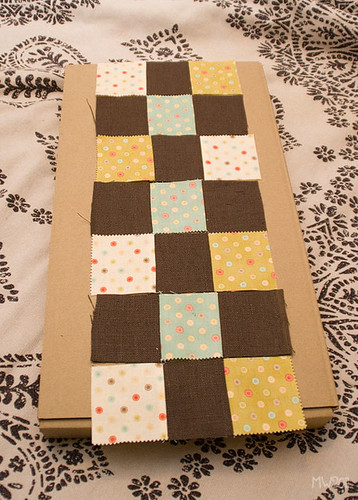
I noticed that the illustration in the book where it shows you how to lay out your squares is backwards. It shows a solid linen square where the patterned fabric is supposed to be. I started laying out my squares according to the book and got confused when I didn't have the right number.
They obviously got it right when they made theirs for the book (it's correct in their finished photo) so It's just lazy for them to not have it right in the illustration.
This is how it should be
Anyway, so I got started piecing and ironing and had all the pieces assembled. Now to attach everything together. This is where the zipper comes in.
well, I started reading the entire rest of the instructions to figure out how everything goes together. I did not like how they had written the instructions to attach the lining though. I really didn't want to hand stitch the entire lining to the bag (and have to be careful enough to not let my stitches go all the way through. Too much hassle!
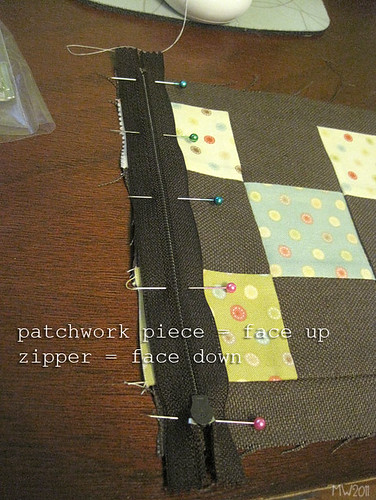
So, I made a few adjustments - this caused me to make some changes on how the zipper was inserted.
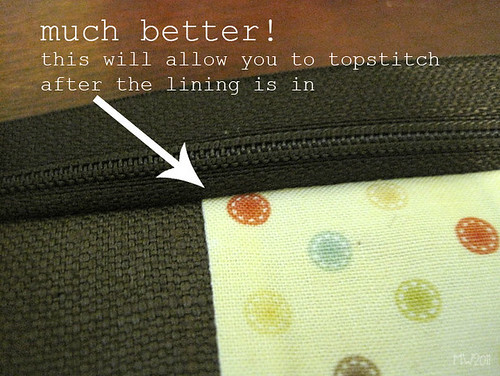
I started by laying my outer piece right side up and the zipper face down on it and stitching it with my zipper foot. This has the same effect as the instructions in the book (which said to press the edge down 1/4" and then stitch with the outer piece on top of the zipper - which would cause the stitch to show on the outside) but mine does not show the stitches on the outside.
(oh yeah, sorry for the difference in quality of the photos here... I just grabbed whichever camera was closest to me)
See?
I did follow instructions for the next steps - but they were a bit confusing. Here is how I did it...
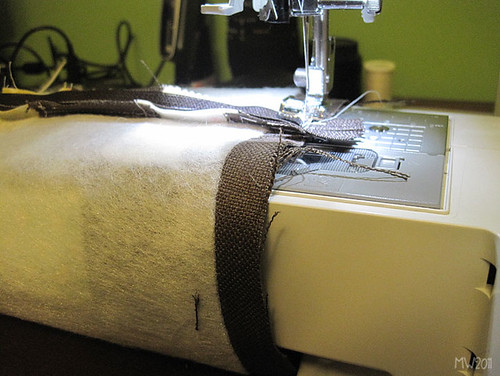
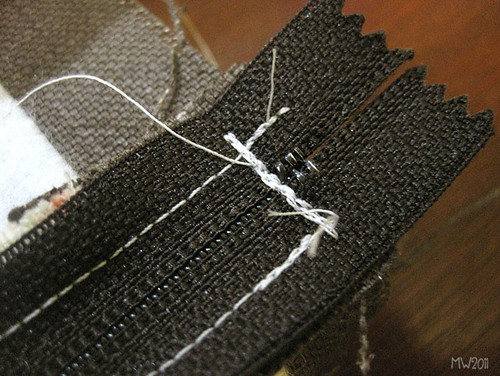
Here you have to reinforce the zipper ends, I slid the tube of fabric around my machine and stitched back and forth a few times at the ends of the zipper. Be careful and go slow - you could easily break your needle if you hit the wrong part of the zipper.
And you get this...
Now you will stitch up the sides. I kept the zipper closed while I was stitching the first side to make sure that it was lined up correctly.
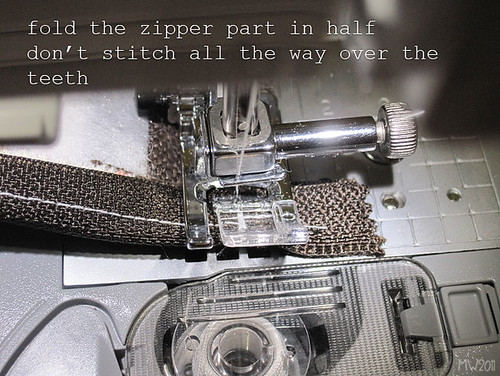
When you flatten your bag so you can sew it, fold the zipper part in half - so that you can stitch right up near the edge, but don't stitch all the way through the zipper this time.
Now, open your zipper (at least enough to get your hand through) and then stitch up the other side the same way.
Turn it right side out to admire your work!
OK, really... you aren't done quite yet.
I followed the instructions for stitching the bottom corners of the bag - except I kind of measured wrong and took it in 1 1/2" instead of the written 1". Oh well. It was too late to change it when I noticed this. It just makes for a smaller bag on the bottom.
Now, you need to attach the lining.
I stitched up the lining as instructed and slid it over my outer piece (you'll have to turn the outside piece inside out again).
When I went to iron down the 1/4" seam allowance at the top (so that there is a clean edge) I noticed that my fabric wasn't quite tall enough to do so. I know that I measured my piece correctly... so there is another flaw in the written instructions.
This is where my trusty Heat-N-Bond tape came to the rescue!
I simply ironed on the tape where I needed the fabric to stick to...
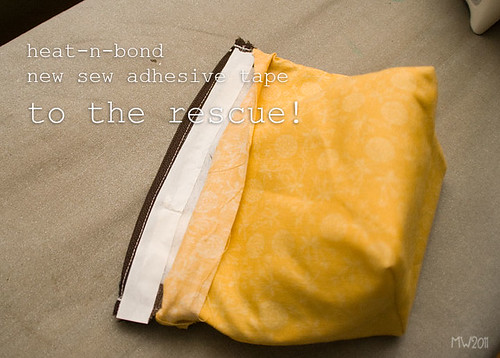
Then took off the paper and ironed my lining down to it (being sure to turn the edges under at least a little bit).
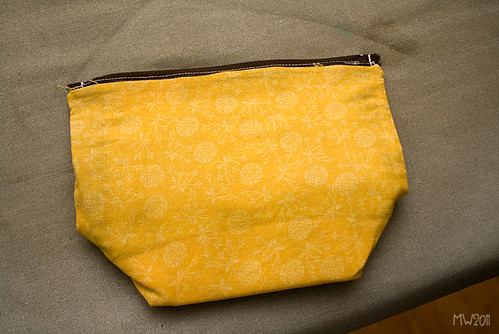
Not bad, huh? Now, since this tape is so strong I guess I could have just left it like that. But, it really did need the top stitching - and it's
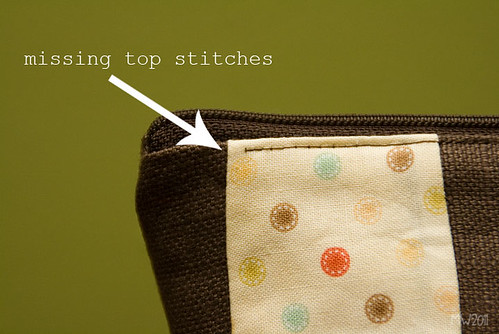
So I took my zipper foot and attached it to my machine again and did a top stitch around the top edge of my bag. Going around or near the zipper ends was tricky though.
On the end where the zipper pull was (when it's unzipped) I even broke my needle and jammed up my machine for a little bit. Not cool.
I decided that since I couldn't easily get to that one little bit of area to finish the top stitch, that it could just stay open there. The Heat-N-Bond tape is holding the lining to the bag, so it's not technically needed at least.
I think that if there were some tabbed ends on the zipper part, like I have done before using this tutorial, then that might have helped a good bit on the zipper troubles.
So, it's done... far from perfect but it's OK. It will either be used by me... or maybe I'll give it to the girls to play with so I'm not really concerned about it being "just right"... Lessons learned at least. If I try this bag again I've definitely got some ideas on how to adjust it to make it better.


Hey well done! I've just been upstairs battling with mine! I've got 3 pieced (one of them has the points NEARLY matching so I'm improving a bit!!) and I did the zippers. I ignored that bit about turning it horizontal as I didn't understand it (I do now - why couldn't they have added a photo like yours??). Then I sewed up the side seams, not doing a 1/4 inch seam, but going up to the edges of the tape. Success!! Well, the blue one did defeat me a bit, but the other two work. How I wish I'd read your post first though as I'm dreading slip stitching that lining in place but I've already top stitched now! They're still not finished. I battled with the corner squashing for a bit then came downstairs for a break! I'll get back onto it another day and I'll post - will be a couple of weeks I think as they are my nemisis!
ReplyDelete