Sunday, January 9, 2011

Inches of snow, thunder and lightning too!


This is just hilarious to me... it doesn't snow in Alabama.  Not usually enough to be concerned with at least.  So last week when the weather guys started predicting snow for tonight/tomorrow I thought "yeah, I'll believe it when I see it".  Our weather guys are usually pretty off anyway. 

Of course, since it doesn't snow much around here everyone panics and rushes the grocery stores.  Not just businesses and schools shut down... the entire city pretty much shuts down.  It's funny.  I've lived in enough places where it snows normally and they would seriously laugh at how things are handled around here.  So I think it's funny.

Around 8:00 pm, there was nothing on the ground at my house, by 9:15 there was a very light dusting and the snow that was falling was pretty fine flakes.  By 10:00 there was probably close to 2 inches on the ground.  It's beautiful.

So, maybe we will get somewhere near that 7-8 inches that they talked about... who knows.  If we do though, let's just hope that my work ends up closing and so does my husbands.  Boy, I sure am glad that I took the chance to get out of this house for  a little bit today.

Oh, and the other interesting thing... it was thundering and lightning out... while it was snowing.  I've NEVER heard of this before.  It surely is strange... but pretty cool actually.  It's apparently got a name... thundersnow.  Sounds made up doesn't it?  Apparently, it's a real thing - see what Wikipedia says about it.

Anyway, provided I don't have to work tomorrow I'll be getting the girls dressed up cute and taking them out for a fun photo op.  That will be awesome!

Another thing I have to try...

Came across this awesome tutorial today... thinking it will be something great to try and make for the girls this Spring. I've got lots of awesome fabrics in my stash that would make a great skirt for this dress! I can't wait to try it!


Find the tutorial here at Make It and Love It.

Saturday, January 8, 2011

My First Quilt

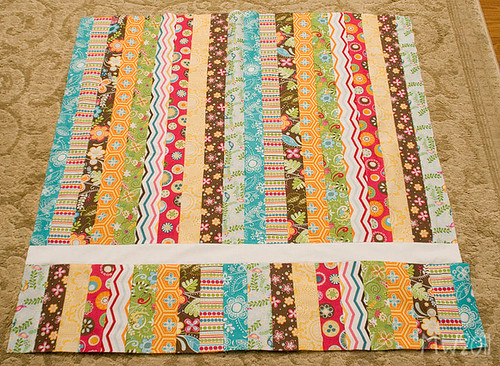
I just finished piecing together my topper for my first ever quilt!!  I was so excited, that I needed to come write this up :)

Check it out, isn't it awesome??

my first quilt - top

I found this cute (mini) jellyroll of fabric at Hobby Lobby on Friday and knew that it would be perfect for this project. I say a mini because it only had 20 strips in it and so was about half the size that I normally see them in. If you are wondering, a jellyroll is made up of 2.5" strips of pre-cut fabric.

It's so much easier to work on something when it's already cut for you... right? :)

The original plan was to just sew each strip together and that would be the topper... but after I got all the strips together, it just looked too plain for me.  I had to do something to mix it up a bit!  So, i cut off a few inches worth and then cut a 2.5" strip of the solid white and stitched that in there - flipping the portion of the strips so that they didn't match up exactly on the other side.

I like it so much better this way... what do you think?

Now, I've just got to figure out what fabric I want to use for the backing and for the binding, then get Mom to help me put it all together... and quilt it of course :)

Yeah!

Friday, January 7, 2011

Project 52: Week 1

I've been wanting to do a Project 365 (where you take a photo each day for an entire year) or Project 52 (one photo each week for the year) for the past few years.  I started off last year trying the 365 and it kind of fizzled out when I went back to work after maternity leave.

So this year I am going to be a little less ambitious and just go for 52.  I'm going to plan to post my new photo every Friday, so check back each week to see what I've got to show off!  It's the end of week one so here is my first photo.

Project 52: Week 1

I've decided this week that I want to make a quilt. I think it will be really cool to at least make one for each of my children to keep forever. Something that they will appreciate (at least when they get older) and know that their Mommy made especially for them.

I've never quilted anything before really. My Mom has though, and I plan on getting some help from her when I need it.

Here's to starting off the year with this new goal!

P.S. Stay tuned for more info about this first little quilt... it's going to be really cute!

Monday, January 3, 2011

Gathered Clutch

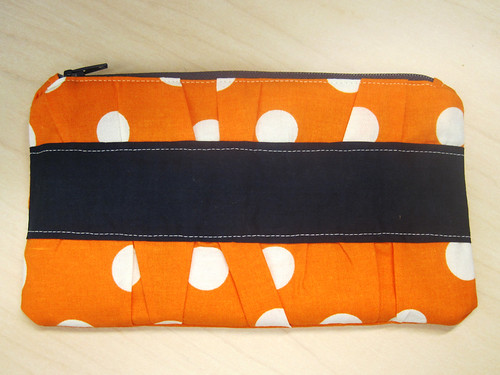
I followed this Gathered Clutch Tutorial at Noodlehead.

gathered clutch - Auburn version

I've been wanting to make one (or some) of these ever since I came across the tutorial on Noodlehead a few months ago.  I could never find the time with all the other things I was trying to get done... plus I had never made anything with a zipper before and it was a little scary.  My mom used to complain about sewing zippers so I was kind of scared off from the begining.  But after looking through the tutorials, it really didn't look all that difficut.  Maybe it's different in clothing or something... who knows.

Anyway... it's my Sister-in-Law's birthday and I figured there was no better occasion to try these out.  It's hard to think of something to get someone especially when their birthday is right after Christmas, but I figured this was something different and totally unique.  I hope she loves it!  We stashed a gift card inside as well.

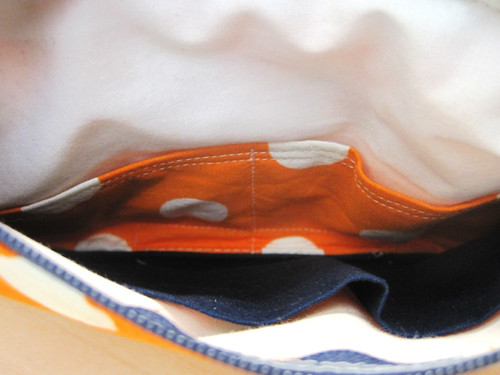
Here's a view of the inside.  It features a divider pocket and 2 card pockets.
gathered clutch - inside view

Here are a few things I thought of when making this... Notes for Next Time:

As Anna says in the tutorial, the part that is going to take the longest is cutting the pieces.  So true - especially since I wasn't completely following directions and ended up wasting interfacing and outside pieces because I ironed them wrong.  Oh well - I'll just save it for the next time when I need those pieces.

The instructions called for an 8" zipper - all I had was a 7"... so I simply extended the size of the tabs to make the entire zipper piece a total of 8.5" as stated is necessary.  This worked out great, the zipper is the exact right size for this bag.

I didn't sandwich my lining/outside/zipper pieces just right when I was attaching the second one.  Therefore, the raw edges show.  It's not so bad, but it wouldn't look like such a mistake if I had messed up on both sides instead of just the one side... oops.

I think I'll make some bags with it gathered on both sides.  Also, I may use ribbon instead of the fabric band.

I really want to dress up the band a little more.  Maybe I could even take the time for some little embroidery design or something on a solid band.  *If I ever get my embroidery machine then I might even make some monogram ones :)

By altering the size of these some, they would make a really cute diaper clutch.  Great gift idea for any new Mom!

I could really go on and on - the possibilities are endless!

Sunday, January 2, 2011

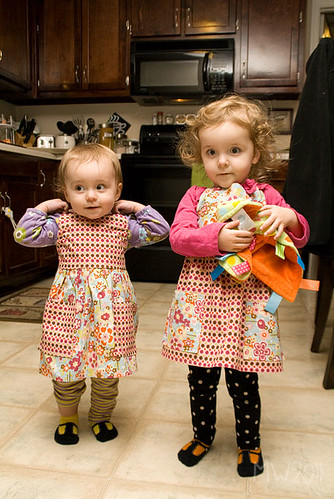
Toddler Aprons - Finally Finished!!

Ahhh... I can finally say that I am done with the little aprons that I made for the girls.  The original plan was for them to be a Christmas gift along with their little play kitchen.  Well, they got the kitchen but the aprons still weren't ready - no big deal... they are 1 and 2, they don't know the difference.

I had been working on these aprons for several months - it really only took so long because I wanted to take my time and make sure I followed the pattern exactly.  The project I did right before I started these didn't work out so well on the measurements so I wanted to be extra sure I got this one right.

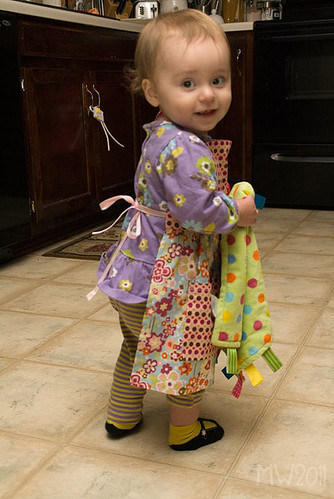
I ended up giving up on making the strap/tie piece in the fabric and just ran some ribbon through it instead.  Not that the strap was the hard part or anything... but who really wants to turn some long skinny strips of fabric right side out when you could make it even easier and use cute ribbon? :)

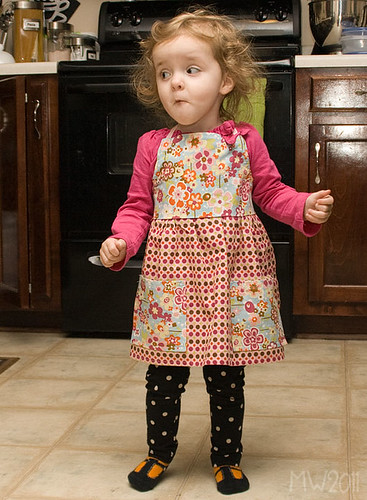
Well, here they are... two super cute little toddler sized aprons :)  What do you think?

aprons

My models aren't always the most cooperative when I need a picture, so this was the best I could get today.

Here you can see the ribbon - see, much cuter than the fabric tie.

aprons


Something that would be really cool would be to monogram these, or applique their initial or something on the front of it. If I ever get my embroidery machine, I just might add the monogram :)

aprons

I made these using this adjustable neck apron Sewing Pattern, Simplicity 2555

Saturday, January 1, 2011

I spent the day today hanging out at my parents house watching football (Roll Tide!), keeping up with kids and I even had a chance to cut out some fabric for my next project.

I got back to my house and found some time to start stitching some of the pieces together and realized that I screwed up.  Yup... lesson learned - always have the instructions pulled up before you start ironing interfacing to your fabric pieces.  Yeah... I'm going to have to re-cut several pieces.  Oops.

Curious about what I'm working on??


I found this cute Gathered Clutch Tutorial at Noodlehead  about a month or so ago and knew that I just had to make one (or some).  I think these would make super cute gifts.  After I make this first one and see how it goes, I'm thinking I'll stitch up some more to stash away for gifts throughout the year.

I'll report back tomorrow with news on how it goes :)
Related Posts Plugin for WordPress, Blogger...