Saturday, August 20, 2011

I've got to try this...

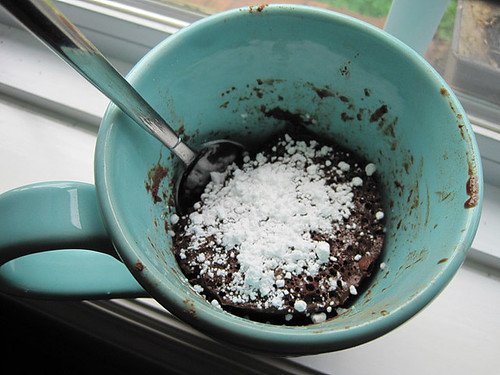
As I was searching through some items I had pinned (on Pinterest - it's amazing if you haven't tried it) on my food board, I ran across this awesome 3 Ingredient, 60 second chocolate mug cake recipe...
and seeing how I am always in the mood for chocolate, I decided that I just had to try it!!

Chocolate Mug Cake

And so I did... It was so super easy, and delicious!!  My husband even said it was good.  I topped mine with a sprinkling of powdered sugar, but it would be really good with some whipped cream or chocolate chips (or both).  Yum! 


Friday, August 19, 2011

Photo blog?

Lately I've been thinking that this might be more effective and interesting if this were a photo blog instead of a regular blog. It's much easier for me to share cool stuff via photos and a few words rather than lots if words and few photos. Plus the easier it is for me to keep this up via my mobile devices the more there will actually be to see. Thoughts?

Monday, July 25, 2011

30 Day Shred - Day 1 again!

Yeah... I did 4 days of my workout after I mentioned it 2 weeks ago, then went on vacation for a week and left my DVD at home.  So no shredding while on vacation.  That seems fair though - right?  :)

I did definitely get much more exercise while on vacation than I normally do when I go to work though.  I spent my days playing with the kids and walking through crowded shopping areas - so I definitely got my steps in.  I've been wearing my pedometer and when at work during the week it's really hard to get even 8000-ish steps in.  This past week I was getting like 15,000 - 18,000 in each day.  :)  Yeah!  So at least I wasn't a total bum while on vacation.

So today I started back on my 1200 calorie limit and did my DVD again.  This time I even got my husband to do it with me!  Yeah!  He says he'll do it again too!!  :)

Oh yeah, while on vacation I tried to eat better but wasn't going to kill myself to just have 1200 calories.  I wanted to be able to enjoy my vacation and try different things.  So I adjusted my calorie counter to track me at around 2000 calories per day which it said was how many were allowed to stay at my current weight.  Worked pretty good too... I weighed myself yesterday and only gained 1lb back.

That puts me at a total of 3lbs lost... 4lbs the first week, plus the 1 I gained back.  I can deal with that. :)

Wednesday, July 13, 2011

Workout update

So far so good!  I started the 30-Day shred work out on Monday morning and it wasn't too bad.  Yes, I definitely felt the burn but it wasn't so horrible that I can't do it.  The big thing that I realized after my first workout was that I really need a better sports bra!  hehe

So, after buying a new sports bra (and wearing a regular bra, and a second sports bra)... I did my 2nd workout on Tuesday evening.  Much better, but wow were my legs feeling the burn!  After my workout I decided to take a lap around the neighborhood.  It was quiet except for the bugs and there was actually a breeze blowing so it was kind of nice.  I probably would have done another few laps if I hadn't gotten so bored.  I really should have taken my iPod so I had something to listen to. :)

Now it's day 3... I think I'm going to give my body a day to rest.  I plan on getting up in the morning and doing the workout again.

So far so good... I've been counting my calories and staying around 1200 net calories.  I haven't had a soda since last Friday and I'm feeling good.

And did you notice the little ticker over there?  3 lbs lost!  I will probably go ahead and say that most of that is from water weight, but hey... I'll take it.  Seeing those numbers (no matter what the reason) is really nice motivation, especially in the beginning!

Saturday, July 9, 2011

Gonna try something new...

I've really been thinking about what I can do to get healthy, maybe loose some of this excess weight, and just plain feel better.  I'm sick of being tired all the time, and tired of hating just about every photo that I see of myself.

Yes, like every woman... I've said this same thing to myself over and over again.  Sometimes I make some progress, but it always becomes an issue again.  This time I'm at least going to get started by making some progress, then I'll work more on keeping it a major part of my life.

Yep, it's time to start the diet and exercise thing again.  The diet part is really just me eating better - healthy foods, no sodas, only natural sugars and only that in small amounts.  Sugar has always been my main downfall, and since I found out that I have some glucose tolerance issues I really want to make this change so that I don't find myself facing diabetes later down the road.

My first goal date is August 11th.  Just over a month away.  My main goal for this date is just to see some progress... I want to be realistic.  We are taking a trip to the beach and it would be wonderful if I could feel like I've made some progress by then.

You'll notice a new ticker in my side bar over there - you see the cute little one with the tape measure?  Yup... there I will report any changes. 

I'm taking measurements and photos for myself, and I'm thinking about if I'll share them or not - that's a tough thing to decide to do.  But... I will take them now, and if I decide to then I'll have them to share. :)

I bought the 30 Day shred DVD and some weights... I know it will be a major effort, but after seeing other people's amazing 30-Day results, I feel pretty confident that I could get some great results myself if I put in the effort.  We'll see what happens.

As far as eating goes, I really can't say that I'm going to do any major popular type of diet.  My main goal is to track my calories and try to stay near 1200 per day.  And of those 1200 calories, to make the most of them... I have done this before when I was pregnant and had gestational diabetes - I know I can do it again. 

That's it!  I'm off to take a few measurements now and get started with my exercise program tomorrow. :) 

Saturday, July 2, 2011

I needed something to wear today, so I made a skirt!

Sorry... There are no photos or links just yet... My actual computer has been sent away for repairs so until at least next Tuesday, all I have is my iPad. There's no taking decent pics with my camera and getting them downloaded until I get my computer... And well, it's just a little too much effort to go back and forth for links on the iPad. I'll add it all in later in the week.

Yep... I'm good like that :)
Well... Not exactly, the skirt is a little wonky and I definitely see ways to make it better next time...
But, it's wearable. I really did wear my new skirt today - out in public and everything. Nobody looked at me strange so I guess it passed the test :)

But for real, I've seen several tutorials out there in blog land about how to make cute little skirts with the yoga style fold over waistband and also ones for making a skirt with a t-shirt. So today I kinda combined some ideas that I've seen and did my own!

Awhile ago I bought a men's XXL basic t-shirt in anticipation of specifically making a skirt for myself with it. I'm proud to say that I actually used the shirt for it's intended purpose, and actually finished the project as well.

This was a really simple way to make a skirt and I definitely plan on doing it again!

Simply lay out your t-shirt flat and use a ruler as a guide. Cut the width of the shirt right underneath the arms. This will give you the longest length of skirt to work with. Plus, you already have a hem on the bottom of your t-shirt so this will save you a stitch or two. :)

Now, cut rectangles from the upper portion of the shirt. This will need to be 1/2 the width of your waist (because you'll have two sides, so that will make it your full waist measurement. You can cut this a little bit smaller than your waist measurement so that the waistband will actually stretch some and therefore stay on your waist. Remember, it's t-shirt fabric... It stretches.

I made the mistake of not taking it in enough, and by the end of the day my waistband had stretched out enough and the skirt was falling off. I'll be taking it in some now so that I can still wear the skirt out in public. ;)

Next, you'll need to pin your two waistband pieces together at the short sides. Use lots of pins... This fabric will stretch and lots of pins helps while you are sewing. Now, sew up your side seams. It's a good idea to use a zig zag stitch or similar if you don't have a serger.

Fold the waistband piece in half over itself. Your wrong sides should be together. This part should now look like the waistband piece of a yoga skirt - cause well, it is. ;)

Increase your stitch length and tension to as loose as possible and run a stitch around the top part of your skirt. Do not back stitch at the ends. Gently pull on one of the strings at each end to gather your fabric. Try to spread the gathers evenly around the skirt to make it look the best. I didn't do so good at this step... I was lazy and my gathers are mostly in the back. Take your time... It will be worth it.

Next, pin your waistband to your skirt - with the skirt inside out, slide the waistband inside with raw edges together. Pin.... Lots!
The more pins you use here the better you will be. Make sure that while you are pinning that the gathers are still evenly spread out.

Once you have fully pinned your pieces together, sew them together.

Ta-da! You now have a new comfy skirt! And how long did it take? Surely no longer than 30 minutes :) even better!

I'll be making at least one more of these skirts, so I'll come back and share that one too.

Saturday, June 25, 2011

And... Done!

OK, so I'm feeling a bit better after my long to-do list this morning.  Today I did actually get some work done around the house plus I got around to making 2 dresses!  Yup.. TWO of them!  I even got a few more rows knit on my sweater as well :)

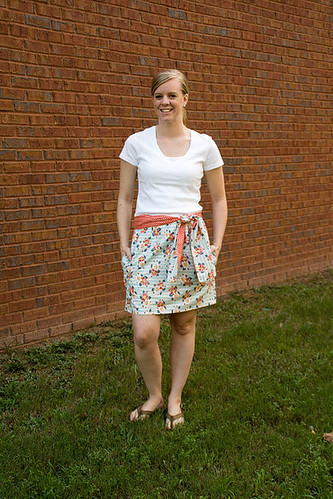
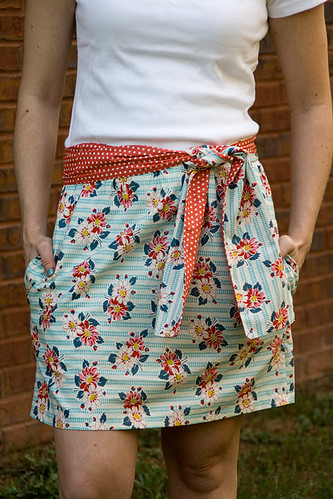
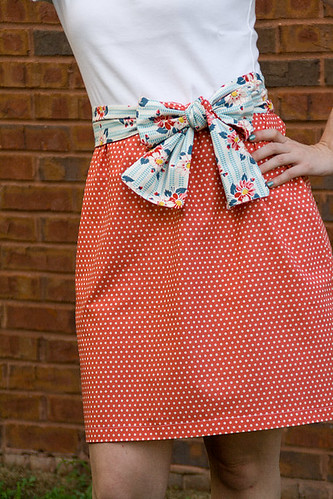
My sister came by after stopping and picking up some fabric at JoAnn.  I took a few measurements and got started with her new dress(es).   A few days ago, my sister, Whitney (of Caught You on Camera), sent me a link to the McIntosh Knockoff Dress at Maybe Matilda... and asked me to make her one.  It's a super cute dress and honestly, really very similar to my Kate Dress that I have made for my daughters.  Same basic concept, except the McIntosh Knockoff features this really fun sash and the best part... pockets!

I was really excited to make a dress with pockets in it... I've never done it until today, and I must say I'm hooked!  I'll probably never (or rarely) ever make a skirt again without pockets.  Shoot, I might even go take a look in my closet and start figuring out which dresses and skirts I could add some pockets to.  hehe  I better slow down though for now. :)

Anyway, the tutorial was super easy to follow and really simple to do.  To be perfectly honest, if you can cut a square/rectangle and sew a straight line, then you can make this dress.    Here's how mine turned out...

This was the first one I made...
McIntosh Knockoff Dress


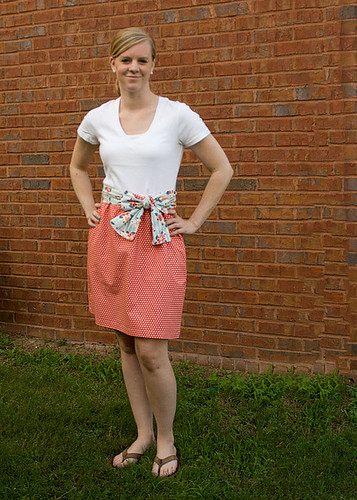
McIntosh Knockoff Dress
I followed the directions exactly - the measurements given in the tutorial were exactly the same as my sister's measurements - how lucky is that!? :) We measured to have the waist of the skirt fall right below her belly button.

On the second one, we made the skirt about an inch above the belly button.
McIntosh Knockoff Dress

McIntosh Knockoff Dress
This one I did a little more A-line. I didn't have a skirt to trace, so I just cut my squares a little wider then folded in half length-wise and cut a diagonal line from the top to the bottom, making sure that I left the width of the waist large enough so that I could gather the skirt still. I just did a straight hem on this skirt and it worked just fine.

The only problem we had was with the sash.  I didn't cut it long enough the first time around, so I ended up going back and having to cut it and add more.  The extra fabric is still here so I think I'm going to re-do the sash to make it look better.

Oh yeah, and the sash... this was the fun part of how it turned out for me - I had the idea that since the fabrics that Whit brought over coordinated, that we could make the sash double sided.  This way I only had to make one sash and also both prints would show when it was tied, adding a little bit more fun to the outfit. :)

These dresses would be really cute with various belts really... just to mix up the outfit a bit...

I'm going to make myself one soon hopefully!!
Related Posts Plugin for WordPress, Blogger...