I came across the cute little Buttercup Bag pattern on the Made by Rae blog recently. I was excited to see that the basic pattern was offered free, but then a little sad when I found out that it was no longer free. The download wouldn't work and after a little research it seemed that it just wasn't offered anymore. I liked the idea of being able to try it out "risk free" and planned on purchasing the pattern if all went well, so that I could make some to sell in my shop. Oh well, so much for that plan.
I was ready to give up and find another pattern to try but my mind kept going back to the Buttercup bag... the comments people had left made it sound like the pattern and instructions were easy to follow, so I gave in and spent the $$ to buy the pattern. I mean, I was planning on buying it anyway... so what's the loss here?
No loss at all! The pattern ended up being pretty simple to follow and I honestly could have finished the entire bag in one evening (about 4-ish hours) if I hadn't kept having issues and sewing my handle inside the lining (totally my fault). Well, OK... I did pick out my fabrics and cut the pieces the evening before and then assemble them the next evening. So maybe total it would have taken 5 hours.
Anyway, here is how my first bag turned out... what do you think?
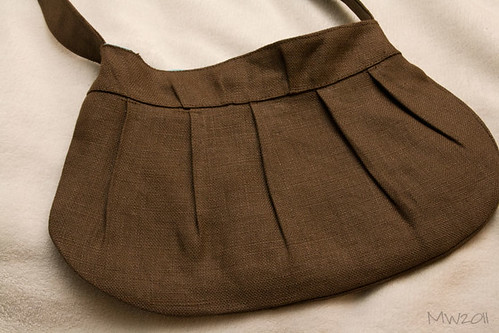
The outer fabric is a thick linen type fabric. I'm not sure exactly what it is... it's one I found in my stash from years ago - but that's kind of what it's like. It was a little hard to sew in some of the thicker areas (like on the handles), but if you go slow enough then it wasn't too bad.
The lining fabric was a fat quarter that I had lying around that went really nicely with the solid brown linen. Oh, did I mention that this entire bag could be completed with less than 2 fat quarters? One for the lining and one for the outer... awesome huh?
The only thing I don't like about this bag is that the magnetic closure seems a bit heavy for the bag itself. I probably could have found a smaller one that would work better. I'll definitely remember this for future bags! A velcro or zipper closure would have worked too... I'd really like to figure out how to add a zipper closure because that would be ideal... for me at least.
I've got another bag cut out and ready to assemble. This time I'm making the larger version - because I really like bigger bags - the small version is wonderful if you like small bags, but I couldn't carry everything I need in it for everyday use.
Do you like my fabric choices?

I've got a gray corduroy (from JoAnns) and some pink/gray patterned fabric (from Hobby Lobby). I think I'll put some more interfacing in the next bag too - just to make it a little more sturdy. I've also found some smaller/lighter weight magnetic closure pieces... so hopefully that will work out better too.
I'll be sure to share once I've got this one finished :)
Have you tried this pattern? Any tips you'd like to share? Please leave them in the comments :)


Very Pretty! And yes I love the fabric! I would love for you to come link up to my Sew Crafty Party this weekend!
ReplyDeleteYour bag is gorgeous! I want to make my mother in law a bag for mother's day and I'd been looking for a pattern which doesn't use much fabric as I mainly buy fat quarters - this fits the bill. I followed the link even though you said it didn't work and I, urm, just downloaded it for free...
ReplyDeleteCute bag and your fabric choices are so modern and fun looking.
ReplyDeleteIsn't that a fun bag to make? Turned out great for you!
ReplyDeleteI've had the pattern saved for a while, just haven't made it up yet. Yours turned out really cute!
ReplyDelete