Showing posts with label clutch. Show all posts

Sunday, February 6, 2011

Experiments with patchwork...

I got this book (I Love Patchwork: 21 Irresistible Zakka Projects to Sew) for Christmas and decided that I was going to start off with the little patchwork bag project.
Photo from book

Cute huh?  I had run across this post and The Crafter's Apprentice and that gave me a little extra push to go ahead and have this be my first project (there were quite a few really cute ones that I was trying to decide between).

Anyway... here is how mine turned out...

patchwork_makeupbag_finished

Not bad, huh? Well... it was a struggle.

This is my first ever patchwork project... so my blocks don't line up exactly. I partially blame this on the fabric (it wasn't the easiest to work with). Oh well. It takes practice.

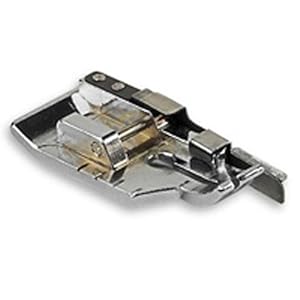
One thing that I have found invaluable for piecing pieces of fabric together (quilting, anything patchwork, anything with a 1/4 seam) is my new 1/4" quilting foot. Wow this thing was so helpful!
There are a few things about the book though...

I noticed that the illustration in the book where it shows you how to lay out your squares is backwards. It shows a solid linen square where the patterned fabric is supposed to be. I started laying out my squares according to the book and got confused when I didn't have the right number.

They obviously got it right when they made theirs for the book (it's correct in their finished photo) so It's just lazy for them to not have it right in the illustration.

This is how it should be
patchwork_makeupbag_layout

Anyway, so I got started piecing and ironing and had all the pieces assembled. Now to attach everything together. This is where the zipper comes in.

well, I started reading the entire rest of the instructions to figure out how everything goes together. I did not like how they had written the instructions to attach the lining though. I really didn't want to hand stitch the entire lining to the bag (and have to be careful enough to not let my stitches go all the way through. Too much hassle!

So, I made a few adjustments - this caused me to make some changes on how the zipper was inserted.

I started by laying my outer piece right side up and the zipper face down on it and stitching it with my zipper foot. This has the same effect as the instructions in the book (which said to press the edge down 1/4" and then stitch with the outer piece on top of the zipper - which would cause the stitch to show on the outside) but mine does not show the stitches on the outside.

patchwork_makeupbag_attach_zipper

(oh yeah, sorry for the difference in quality of the photos here... I just grabbed whichever camera was closest to me)

See?
patchwork_makeupbag_attach_zipper_after

I did follow instructions for the next steps - but they were a bit confusing. Here is how I did it...

Here you have to reinforce the zipper ends, I slid the tube of fabric around my machine and stitched back and forth a few times at the ends of the zipper. Be careful and go slow - you could easily break your needle if you hit the wrong part of the zipper.

patchwork_makeupbag_reinforce_zipper

And you get this...
patchwork_makeupbag_reinforce_zipper_end

Now you will stitch up the sides. I kept the zipper closed while I was stitching the first side to make sure that it was lined up correctly.

When you flatten your bag so you can sew it, fold the zipper part in half - so that you can stitch right up near the edge, but don't stitch all the way through the zipper this time.
patchwork_makeupbag_stitch_edges

Now, open your zipper (at least enough to get your hand through) and then stitch up the other side the same way.

Turn it right side out to admire your work!

OK, really... you aren't done quite yet.

I followed the instructions for stitching the bottom corners of the bag - except I kind of measured wrong and took it in 1 1/2" instead of the written 1". Oh well. It was too late to change it when I noticed this. It just makes for a smaller bag on the bottom.

Now, you need to attach the lining.

I stitched up the lining as instructed and slid it over my outer piece (you'll have to turn the outside piece inside out again).

When I went to iron down the 1/4" seam allowance at the top (so that there is a clean edge) I noticed that my fabric wasn't quite tall enough to do so. I know that I measured my piece correctly... so there is another flaw in the written instructions.

This is where my trusty Heat-N-Bond tape came to the rescue!

I simply ironed on the tape where I needed the fabric to stick to...
patchwork_makeupbag_adhesive_tape

Then took off the paper and ironed my lining down to it (being sure to turn the edges under at least a little bit).
patchwork_makeupbag_lining

Not bad, huh? Now, since this tape is so strong I guess I could have just left it like that. But, it really did need the top stitching - and it's always usually much better looking that way.

So I took my zipper foot and attached it to my machine again and did a top stitch around the top edge of my bag.  Going around or near the zipper ends was tricky though.

On the end where the zipper pull was (when it's unzipped) I even broke my needle and jammed up my machine for a little bit.  Not cool.

I decided that since I couldn't easily get to that one little bit of area to finish the top stitch, that it could just stay open there.  The Heat-N-Bond tape is holding the lining to the bag, so it's not technically needed at least.

patchwork_makeupbag_missing_stitches

I think that if there were some tabbed ends on the zipper part, like I have done before using this tutorial, then that might have helped a good bit on the zipper troubles.

patchwork_makeupbag_finished

So, it's done... far from perfect but it's OK.  It will either be used by me... or maybe I'll give it to the girls to play with so I'm not really concerned about it being "just right"... Lessons learned at least.  If I try this bag again I've definitely got some ideas on how to adjust it to make it better.


handmade projects Photobucket

Monday, January 3, 2011

Gathered Clutch

I followed this Gathered Clutch Tutorial at Noodlehead.

gathered clutch - Auburn version

I've been wanting to make one (or some) of these ever since I came across the tutorial on Noodlehead a few months ago.  I could never find the time with all the other things I was trying to get done... plus I had never made anything with a zipper before and it was a little scary.  My mom used to complain about sewing zippers so I was kind of scared off from the begining.  But after looking through the tutorials, it really didn't look all that difficut.  Maybe it's different in clothing or something... who knows.

Anyway... it's my Sister-in-Law's birthday and I figured there was no better occasion to try these out.  It's hard to think of something to get someone especially when their birthday is right after Christmas, but I figured this was something different and totally unique.  I hope she loves it!  We stashed a gift card inside as well.

Here's a view of the inside.  It features a divider pocket and 2 card pockets.
gathered clutch - inside view

Here are a few things I thought of when making this... Notes for Next Time:

As Anna says in the tutorial, the part that is going to take the longest is cutting the pieces.  So true - especially since I wasn't completely following directions and ended up wasting interfacing and outside pieces because I ironed them wrong.  Oh well - I'll just save it for the next time when I need those pieces.

The instructions called for an 8" zipper - all I had was a 7"... so I simply extended the size of the tabs to make the entire zipper piece a total of 8.5" as stated is necessary.  This worked out great, the zipper is the exact right size for this bag.

I didn't sandwich my lining/outside/zipper pieces just right when I was attaching the second one.  Therefore, the raw edges show.  It's not so bad, but it wouldn't look like such a mistake if I had messed up on both sides instead of just the one side... oops.

I think I'll make some bags with it gathered on both sides.  Also, I may use ribbon instead of the fabric band.

I really want to dress up the band a little more.  Maybe I could even take the time for some little embroidery design or something on a solid band.  *If I ever get my embroidery machine then I might even make some monogram ones :)

By altering the size of these some, they would make a really cute diaper clutch.  Great gift idea for any new Mom!

I could really go on and on - the possibilities are endless!

Saturday, January 1, 2011

I spent the day today hanging out at my parents house watching football (Roll Tide!), keeping up with kids and I even had a chance to cut out some fabric for my next project.

I got back to my house and found some time to start stitching some of the pieces together and realized that I screwed up.  Yup... lesson learned - always have the instructions pulled up before you start ironing interfacing to your fabric pieces.  Yeah... I'm going to have to re-cut several pieces.  Oops.

Curious about what I'm working on??


I found this cute Gathered Clutch Tutorial at Noodlehead  about a month or so ago and knew that I just had to make one (or some).  I think these would make super cute gifts.  After I make this first one and see how it goes, I'm thinking I'll stitch up some more to stash away for gifts throughout the year.

I'll report back tomorrow with news on how it goes :)

Sunday, November 14, 2010

Houndstooth Clutch

Ok, so it doesn't have to be houndstooth - but mine is :)

How cute is this?


I made it using a freebie pattern that I found at ithinksew.com.  I figured, it be a really cute, quick something to make and there are endless possibilities of what you could to do customize this little clutch.  I decided it was best to start with the pattern as written, then for future ones then I could do something a little different.

The pattern is for beginners, but there do seem to be some instructions that are implied.  Pay attention to what you are doing and think twice before you stitch - otherwise, you'll end up ripping seams (like me).

This is the second pattern of theirs I have tried (... more about the first one later).  I found a pattern that I really like for a new purse too.  Their patterns are really adorable!!

Things I did differently, or noticed for next time...
I didn't have a magnetic closure, but I did have velcro... so I used velcro - which was iron on, so no extra stitching :)

There is a pattern piece for a handle - this is optional, mine obviously didn't have it.  The instructions for adding this handle are at the very end of the instructions pages, so I had actually cut out a piece and still have it left over for next time (guess I'm making another houndstooth one :)).  So if you want the handle, check the instructions at the end of the packet before you begin.

When you add the lining and the exterior together, it simply says to put the right sides together (which is correct... but it doesn't exactly tell you that you should fold the flap piece into the inside of the bag before you add the lining.  So, make sure you fold it in before you stitch the lining in place otherwise, you'll end up with a bag with the flap hidden somewhere inside the lining.

And I'm not really sure how this happened... but my lining is a bit baggy and too big for the inside of my bag (the lining is bigger than the exterior).  Not sure what happened, because I really did follow instructions and used the right size seam allowances.

Anyone else want to try and make one?  I'd love to see pictures!
Related Posts Plugin for WordPress, Blogger...